
How to Build a 3D Product Configurator

How to Build a 3D Product Configurator in 2026
Building a 3D product configurator means more than placing a 3D viewer on a product page. It means connecting visual customization to pricing logic, manufacturing constraints, and order output — so that every configuration a customer completes is one your business can actually deliver. This guide covers the full process: asset preparation, configuration logic, UI design, implementation path decisions, and ecommerce integration, with the technical specifics that most overviews skip.
Quick Summary: How to Build a 3D Product Configurator
- Prepare and structure your 3D models: Create optimized GLB/GLTF assets, separated by configurable parts — base, materials, components — not as a single merged mesh.
- Build the configuration logic layer: Define material swaps, part visibility rules, and constraint logic that prevents invalid combinations.
- Connect pricing to configuration: Every option change should update price in real time, including tiered materials, add-ons, and volume rules.
- Design the UI around the decision flow: Swatches, dropdowns, and option panels should match how customers actually think about the product, not how it is stored in your database.
- Choose your build path: Platform (fastest, most scalable), developer framework (most flexible), or custom build (most control, highest cost).
- Integrate and test: Connect to your ecommerce stack, validate CPQ output, and test on real devices before launch.
What a 3D Product Configurator Actually Does
A 3D product configurator is an interactive tool that lets a buyer or sales representative assemble a product variant in real time — selecting colors, materials, components, dimensions, or modules — and immediately see the result rendered as a photorealistic 3D model. At its most basic, it is a visual selection interface. At its most capable, it is a system that validates combinations against manufacturing rules, calculates price dynamically, and outputs structured order data without manual intervention.
The distinction matters because many teams build the visual layer first and discover later that the configurator produces combinations their factory cannot build, or that the output requires manual re-entry before it can become a real order. A well-built configurator closes that loop from the start.
For context on which type of configurator matches your use case — visual, CPQ, or parametric — see our guide to 3D product configurators.
Step 1: Prepare and Structure Your 3D Models
Asset quality determines the ceiling of everything else. A poorly structured or over-heavy model creates problems that no amount of UI refinement or platform capability can fix.
File Format and Export
GLB is the standard delivery format for web-based 3D configurators. It is a binary container of the glTF specification — compact, widely supported by WebGL renderers, and compatible with major platform players and frameworks. Export your models in GLB unless your platform specifically requires a different format.
For products that will also need AR preview on iOS, you need a USDZ export alongside GLB. Maintaining a single source file (usually in your 3D authoring tool of choice) and generating both formats as build outputs is the cleanest long-term approach.
Structure for Configuration
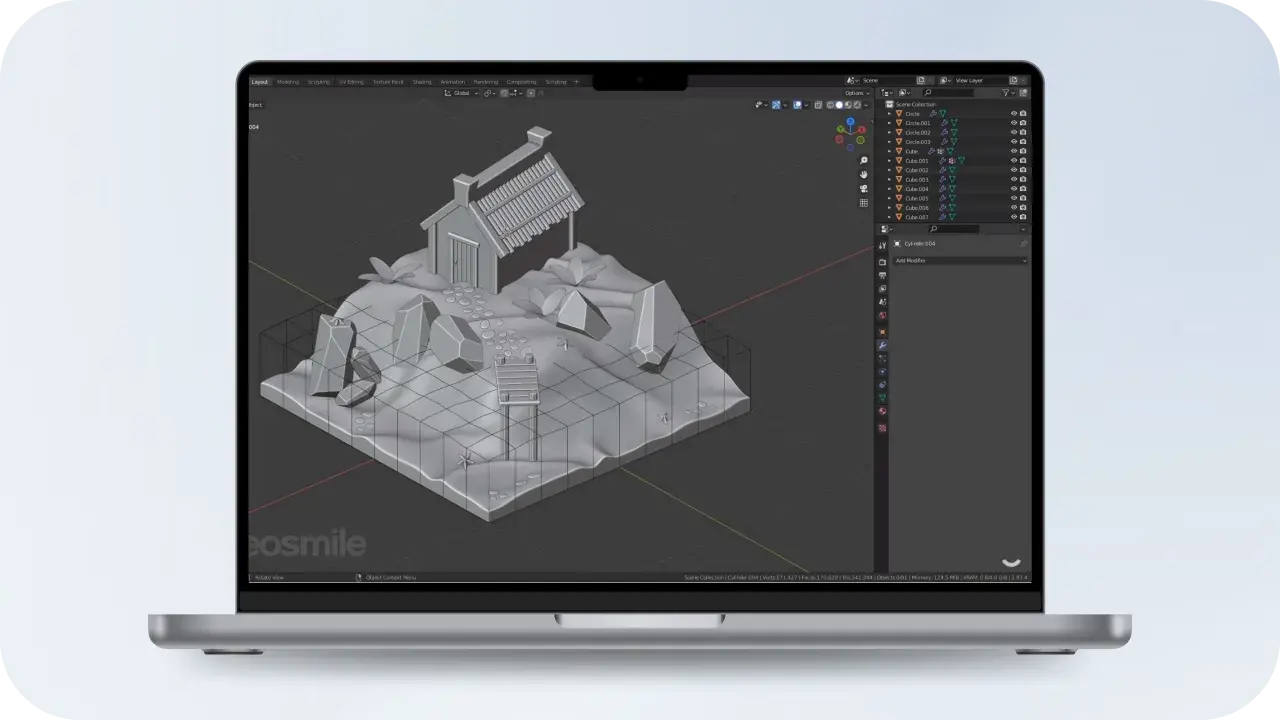
This is where most first-time configurator projects make their critical mistake. A product model intended for a configurator cannot be a single merged mesh. It must be structured so that individual configurable parts — frame, upholstery, legs, finish, hardware — are separate nodes in the scene hierarchy that can be independently shown, hidden, swapped, or re-textured at runtime.
Before exporting, confirm that your model structure maps to your configuration logic. If a customer will choose from four leg styles, those four leg meshes need to exist as distinct objects that the configurator can toggle. If they will choose a fabric color, the material slots must be named and accessible to the rule engine.
Optimization for Web Performance
- Polygon count: Target under 100k triangles per product for smooth performance on mid-range mobile devices. Complex industrial products may need level-of-detail strategies.
- Texture compression: Use KTX2 or Basis Universal. Uncompressed 4K textures will destroy load time and memory headroom on mobile.
- Draco compression: Compresses geometry significantly with minimal visual impact. Supported by most platform players and the
model-viewerweb component. - Material baking: Pre-bake lighting and ambient occlusion into textures where the configurator does not need real-time lighting changes. This reduces render complexity significantly.
Step 2: Build the Configuration Logic Layer
The logic layer is what separates a 3D product viewer from a product configurator. It enforces which combinations are valid, what happens when a selection changes, and how downstream data is structured for pricing and order output.
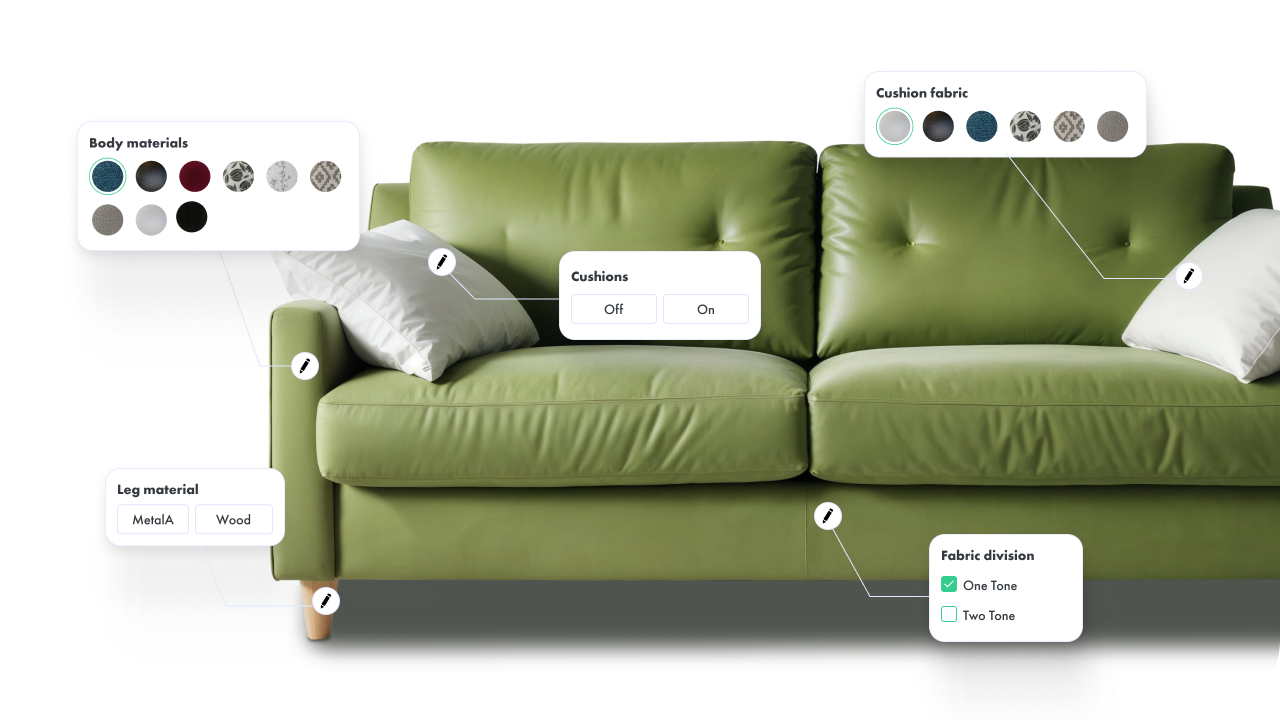
Material and Texture Swapping
The most common configuration action is material or color selection. At the implementation level, this means maintaining a library of materials — each with its own PBR texture maps (base color, roughness, metalness, normal) — and mapping them to named material slots in the model. When a user selects "Oak Veneer," the configurator swaps the material on the relevant mesh nodes and re-renders.
For large material libraries, lazy loading matters. Loading all material textures upfront increases initial load time significantly. A well-built configurator loads only the selected and adjacent materials, fetching others on demand.
Part Swapping and Visibility Rules
Beyond material changes, many products require structural configuration — showing or hiding components, swapping between variant meshes (different drawer types, different arm styles), or assembling modular units. This is controlled through a rule engine: a set of conditional logic that maps user selections to model state changes.
A basic rule might read: if the user selects "Sofa with Chaise," show the chaise node and hide the standard end node. A more complex rule might enforce that a particular leg style is only available with certain frame types, or that adding a module requires minimum width selection.
Constraint Logic: Preventing Invalid Configurations
This is the most operationally important part of the configurator and the most commonly underbuilt. If a customer can configure and order a combination your production line cannot fulfill, the cost appears downstream: in customer service, in returns, in production errors, in damaged supplier relationships.
Constraint logic should be defined in collaboration with your production or engineering team, not left to the UI designer. Every rule your factory enforces — minimum dimensions, incompatible material pairings, structural dependencies between modules — should have a corresponding constraint in the configurator that prevents the invalid state rather than flagging it after submission.
Step 3: Connect Pricing to Configuration
A configurator without real-time pricing produces a visual experience that still requires a manual quote step — which eliminates much of the commercial value. The pricing engine should update the displayed total with every configuration change, in real time, with no manual intervention.
Pricing logic typically involves:
- Base price — the starting price for the default configuration
- Material surcharges — premium fabrics, finishes, or hardware grades that add to the base
- Component add-ons — modules, accessories, or upgrade options with individual pricing
- Dimension-based pricing — for products priced by size, where price scales with configured dimensions
- Volume and tier rules — relevant for B2B configurators where quantity affects unit price
- Discount and approval logic — for enterprise sales workflows where certain configurations require sign-off
The pricing engine should be connected to your master pricing data — not hardcoded into the configurator front end. Hardcoded pricing creates a maintenance burden every time prices change and introduces risk of inconsistency between the configurator and your ERP or commerce platform.
Step 4: Design the UI Around the Customer's Decision Flow
The configurator interface should map to how a customer thinks about building a product — not how the product data is structured in your database. These are often very different things.
Option Panel Design
- Color and material swatches work best as visual tiles, not dropdown menus. Seeing the actual material at thumbnail scale is part of the decision, not a step before the decision.
- Dropdowns work for options where the label is self-explanatory and the number of choices is large — leg styles, module types, size ranges.
- Step-based flows (one decision group at a time) work well for complex products where presenting all options simultaneously creates cognitive overload. They also guide less experienced buyers through unfamiliar choices.
- Progressive disclosure — showing dependent options only after their parent is selected — keeps the interface clean and prevents confusion from options that are irrelevant to the current configuration state.
Camera Controls
Buyers need to inspect what they are building. At minimum: orbit (rotate), zoom, and a set of preset camera angles (front, side, detail) that show the product at its best. For modular products, the ability to see the full assembled configuration from above or at an isometric angle is often as important as the close-up material view.
Summary and Output
Before checkout or quote submission, the configurator should present a complete configuration summary: every selected option, the total price, and a rendered image of the final configuration. This serves as both a buyer confirmation step and the source of the order data that flows downstream. For B2B use cases, this summary becomes the quote document — and its accuracy is what allows a sales cycle to close without a manual quoting step.
Step 5: Choose Your Build Path
There are three well-defined approaches to building a 3D product configurator. The right choice depends on your team's technical capacity, your catalog size and complexity, and your timeline.
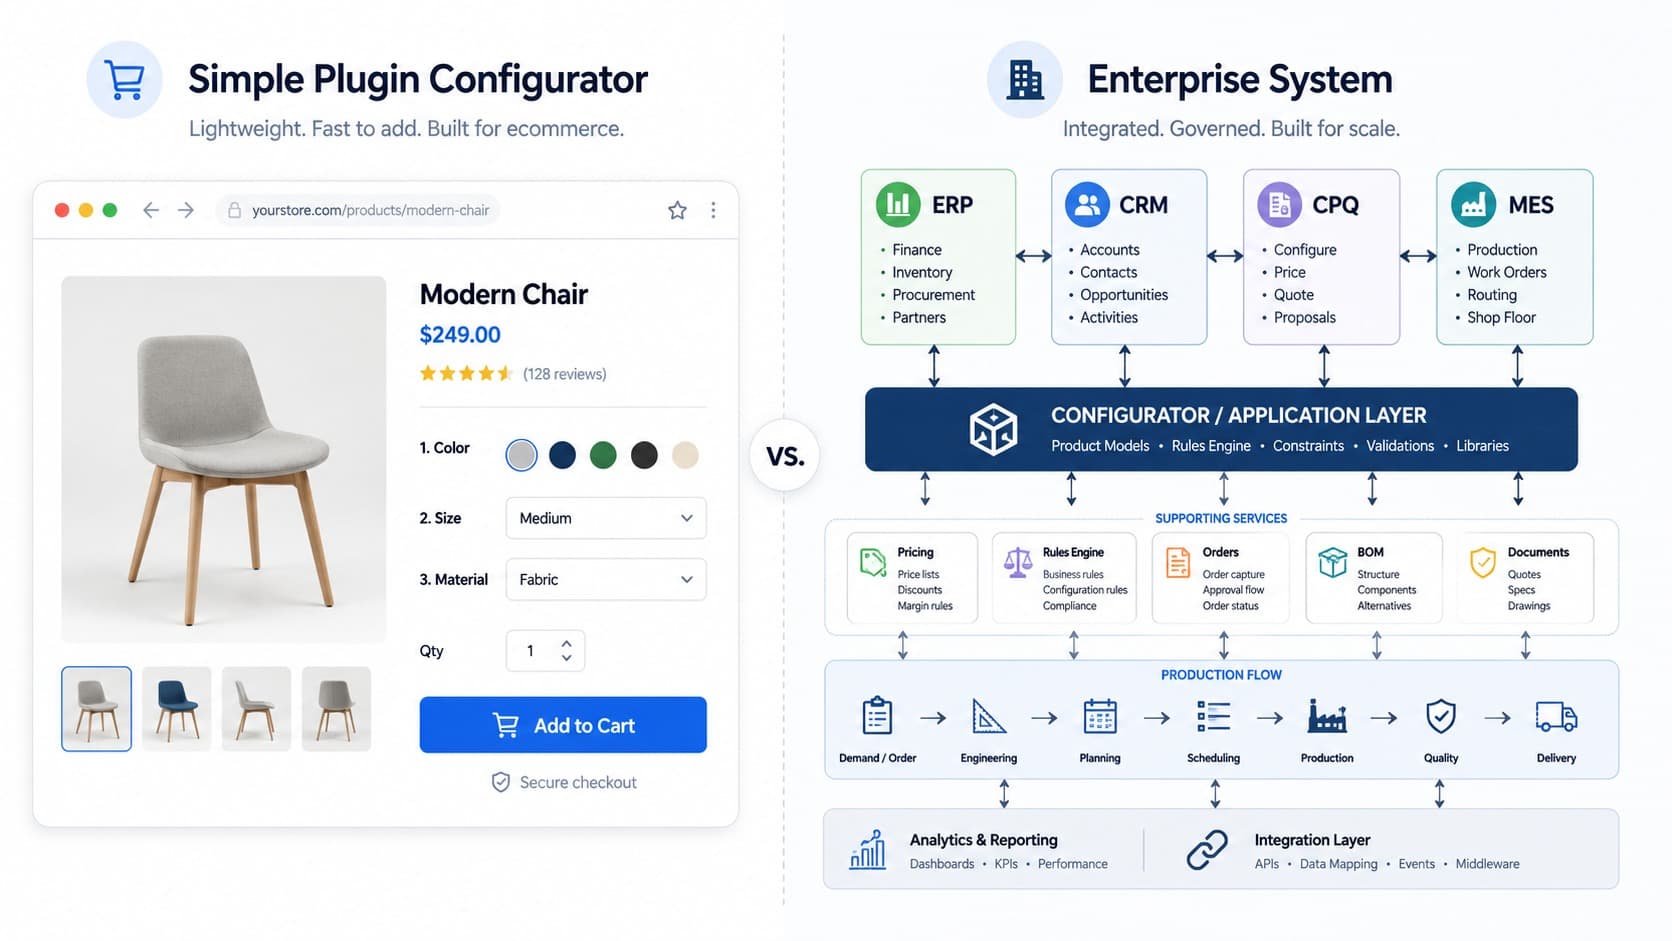
Platform Approach — Fastest to Market, Most Scalable
Managed configurator platforms provide the rendering engine, rule engine, pricing integration, and ecommerce connectors as a service. You bring the 3D assets and product logic; the platform handles the technical infrastructure. Vivid3D is built around this model — with Vivid.Build handling the configurator layer and Vivid.Player managing cross-platform publishing, including AR delivery, as part of a unified content infrastructure.
The tradeoff is that the platform's architecture defines your interaction ceiling. For standard material swaps, part toggling, and CPQ output, platforms cover most needs. For deeply custom AR interactions or unique UI patterns, you may need to extend or move to a custom build.
Developer Framework Approach — Most Flexible for Web Teams
Teams with strong front-end capability can build configurators on top of Three.js, React Three Fiber, or Babylon.js. These frameworks handle WebGL rendering and give you full control over the scene, camera, lighting, and interaction model. You build the rule engine, pricing logic, and UI on top.
This approach offers the most flexibility for custom interaction design. The cost is that you own the full stack — rendering performance, mobile compatibility, fallback behavior, AR integration, and long-term maintenance. Plan staffing accordingly.
Custom Build with a Specialist Partner
For enterprise deployments with complex manufacturing logic, deep ERP integration requirements, or proprietary visualization needs, a custom build with an experienced implementation partner is often the right answer. The advantage is a solution precisely fitted to your business rules. The risk is vendor dependency — if the relationship ends, you may need to rebuild from scratch.
Build Path Comparison
Step 6: Integrate with Your Ecommerce Stack
A configurator that cannot pass its output cleanly into your commerce and operations systems is not a finished product — it is a visual demo. Integration is where the commercial value is realized or lost.
Ecommerce Platform Connections
For Shopify, WooCommerce, and Magento, most platform-based configurators offer native plugins or API connectors that pass the configured SKU, selected options, and price directly into the cart. The configured product image — generated from the final render — is typically passed as a line item image for order confirmation and fulfillment reference.
For custom builds, integration is handled via API: the configurator posts a structured payload (options selected, pricing calculated, BOM generated) to your commerce platform or order management system on checkout.
ERP and Manufacturing Integration
For manufacturers, the configurator's real value is in eliminating the translation step between customer order and production order. A well-integrated system passes a validated BOM directly to the ERP at order placement — removing manual data re-entry and the errors that come with it. This requires that the configurator's output format matches what your ERP expects, which is a design decision that should be made at the start of the project, not at integration time.
CPQ Output
For B2B and dealer sales workflows, the configurator should be able to generate a quote document — PDF or structured data — that includes the full configuration summary, pricing breakdown, and a rendered image of the configured product. This replaces the manual quoting process and shortens the sales cycle by allowing a verified quote to be produced at the moment of configuration rather than hours or days later.
Common Mistakes to Avoid
- Building the visual layer first, logic last. Constraint logic and pricing integration are harder to retrofit than they are to design upfront. Start with the data model and rules, then build the UI around them.
- Unoptimized assets treated as a launch problem. Heavy models slow load times and create poor mobile experiences. Asset optimization is a prerequisite for launch, not a post-launch optimization task.
- Configurator output disconnected from operations. If every order still requires a human to re-enter data from the configurator into another system, the configurator has not delivered its operational value. Integration should be part of the initial scope.
- No mobile testing before launch. A configurator that looks and performs well on a desktop may be unusable on a mid-range smartphone. Test on real devices across iOS and Android before going live.
- Treating the configurator as a one-time build. Products change, pricing changes, materials change. A configurator needs to be maintainable — meaning your team (or your platform) can update assets, rules, and pricing without a full redevelopment cycle.
FAQ
How long does it take to build a 3D product configurator?
Timeline depends heavily on the build path and product complexity. A platform-based configurator with existing 3D assets can be live in two to six weeks. A developer framework build typically takes two to four months. A custom enterprise build with ERP integration may run six months to a year. Asset preparation — the time to create or optimize 3D models — is often the longest single step regardless of approach.
How much does it cost to build a 3D product configurator?
Platform SaaS solutions typically start at a few hundred to a few thousand dollars per month depending on features and catalog size. Developer framework builds are costed in engineering time — typically hundreds of hours for a production-ready system. Custom enterprise builds with deep integration work range from tens of thousands to several hundred thousand dollars depending on scope. Asset creation costs (3D modeling) are a separate variable and often significant for large catalogs.
What 3D software is used to create configurator models?
Common authoring tools include Blender (open source, widely used), Cinema 4D, Maya, and 3ds Max. For products that originate as CAD files (engineering and manufacturing contexts), Fusion 360, SolidWorks, and Rhino can export to GLTF/GLB with conversion tools. The choice of authoring tool matters less than how models are structured for configuration — separated parts, named material slots, and optimized geometry.
Can I add AR to a 3D product configurator?
Yes, and in 2026 it is increasingly expected for furniture, home goods, and consumer product categories. AR allows the buyer to place their configured product in their actual space before purchasing. The configured model in GLB format can be passed directly to a WebXR or AR Quick Look viewer. Platforms like Vivid3D handle AR delivery as part of the publishing layer, without requiring a separate AR build. For a full implementation guide, see our article on how to implement AR on a website.
What is a rule engine in a product configurator?
A rule engine is the logic layer that controls which configurations are valid. It maps user selections to model state changes (show this mesh, hide that one, swap this material) and enforces manufacturing constraints (this leg style is incompatible with this frame type). A rule engine is what distinguishes a product configurator from a simple 3D viewer — it ensures that every configuration a customer completes is one the business can actually produce.
How do I connect a configurator to Shopify or WooCommerce?
Platform-based configurators typically offer native plugins for Shopify, WooCommerce, and Magento that pass the configured variant, selected options, price, and rendered image directly into the cart. For developer framework or custom builds, integration is done via the platform's API — posting a structured order payload at checkout. The key is ensuring the configurator's output format matches what the commerce platform expects for line items, variant data, and product images.

.png)